
Windows and Exchange patching
Windows and Exchange Application patching is an important task and this should be maintained on regular basis and this also requires a proper planning.
If we don’t perform patch on the servers there are chances that we might see Servers on risk like
1: Security risk
2: Application bugs.
So we will discuss how to perform Patching on Windows and Exchange Servers.
In-order to perform we need to have proper permissions. As we discussing about Windows and Exchange Servers so let’s see what are Permissions that are required.
| Patching Mode Name | Permissions |
| Windows Patching | Local Administrator |
| Exchange Patching | Local Administrator |
| Schema Admins | |
| Enterprise Admins | |
| Domain Admins | |
| Organization management |
Note :
Microsoft releases the patches on 2nd Tuesday of every month (Windows Patches).
So plan it accordingly, before patching on the Production Servers it would be recommended to test on lab servers if it works well then plan it on your Production servers.
Prerequisites :
1: Test the patches in the Lab machines.
2: Raise a change request if your using Monitoring Tools, and wait for the approval “Also write tested in the lab”.
3: Once Change has been approved go ahead with further steps.
4: Place servers in the Maintenance mode SCOM/Tivoli/other monitoring tool
Steps to Perform Patching (Windows):
Step1 : If your using any monitoring Tools like SCOM or Tivoli then place them maintenance mode to stop the alerts getting generated.
Step2: Now login to Exchange Server and check for the latest updates.
Step3: Open the EMS(Exchange Management Shell) Run as Administrator.
Step4: Now before starting patch work we’ll move the PAM to another Server\
To Move PAM to another Server below is the command:
cluster.exe “DagName” group “Cluster Group” /MoveTo:”destinationServer”
Step5: Run the command “Set-ExecutionPolicy Unrestricted”
Step6: Locate the point to Scripts folder as shown below.

Step7: Run the below script
.\maintenanceWrapper.ps1 –server <SERVERNAME> –action Start
For More Info : DAG Maintenance Scripts Steps
Let’s start Windows Patching
Go to start -> All Programs -> Windows Update -> Click the Available updates.
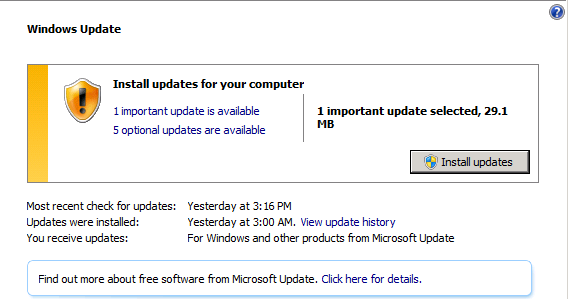
Step8: Check that there are no Exchange rollup/hotfix/ServicePack, if there is a rollup checked then UNCHECK the Exchange rollup/hotfix/ServicePack. Because we are doing Window Patching not the Exchange 🙂
Step9: Then Click ok and then click on Install Updates as shown in the below Screenshot.

Step10: Once completed click finish and restart the server.
Step11: Again open the EMS “Run as Administrator”.
Run the same command but here we need to stop the Maintenance mode:
.\maintenanceWrapper.ps1 –server <SERVER NAME> –action Stop
To Verify if the Maintenance mode is stopped or not to confirm then run the below command again
Get-DatabaseAvailabilityGroup -Status | fl Name,serversinmaintenance
To check the Database mounted on which server run the below cmdlet:
Get-MailboxDatabase | fl name,Server
After confirming that maintenance stopped then move the Databases to Active Copy using the below command.
Move-ActiveMailboxDatabase -Identity ‘Db Name’ -ActivateOnServer ‘Destinationserver’ -MountDialOverride ‘None’
Steps to Perform Patching (Exchange):
Step1: Download the patch or service pack from Microsoft link only.
Step2: This “service pack/ roll up” will be preferred to download to one server and copied to all other server.
Step3: Follow the same procedure as we have done for Windows and Install the Exchange patch.
Step4: Restart the server once Exchange patching has completed
Final Step is to Stop the Maintenance Mode for the Monitoring Tools like SCOM \Tivoli
Note: While performing Exchange Patching please follow the steps are below :
Example:
Scenario 1
Let’s take 2 Nodes
Node1 All Roles in One Box
Node2 All Roles in One Box
Moving the DAG and Database Copies based on your Requirement.
Scenario 2
Again 2 Nodes Scenario
Node1 CA/HB
Node2 Mailbox
Recommended to perform Maintenance on Node1 (CA/HB) first and then Node2
Verification Tests
Run the following tests on all Exchange servers
1: Test-ServiceHealth
No service should show in Service not running under any role.
If all in one roles then:

If CA/HB then the output would be as shown below :

2: Check the Queue if there are any emails stuck in the queue.
3: Test-ReplactionHealth
4: Test-OutlookWebServices
5: Test-Mapiconnectivity
6: Get-mailboxdatabasecopystatus *\*

7: Login to OWA using test account and test send and receive of the email.
For More Info on DAG: Exchange-maintenance-Monitoring-Command Kit
Praveen Kumar
MCTS | Exchange Server
Publisher of Techrid.com
