
Home » Exchange Server 2010 » High Availability » Clustering
Category Archives: Clustering
Configuring Window 2008 Network Load Balancer (NLB) for Exchange 2010 CAS
Configuring NLB for Exchange 2010 CAS (Array)
Exchange 2010 RPC Client Access Service and the ClientAccessArray (CAS), dependence on the Client Access Server (CAS) role, which has been increased in Exchange 2010.
This is because, in Exchange 2010, on-network Outlook MAPI connectivity now connects to a mailbox through the CAS role via the RPC Client Access Service. As a result, high availability of the CAS role is crucial since any failure of CAS could affect Outlook client connectivity.
Prerequisites for NLB (Network Load Balancer)
Exchange 2010 servers (each with two NICs) with the CAS role installed have been deployed,
First, you must allocate a dedicated private IP address and create an associated A record in DNS for the NLB cluster. This IP address and name are what clients will connect to and against which the ClientAccessArray will be created.
NLB can be configured either in unicast or multicast mode.
What is Unicast & MultiCase?
For More Info: Methods for Configuring NLB
Unicast is the preferred method for NLB on Hyper-V, we’ll see this in details the procedure and steps explained below:
So let’s jump creating NLB (Network Load Balancer) using Unicast as shown below:
Before starting we need to prepare two NIC Card
|
1 |
Public LAN | Used for communication with clients and servers on the network |
| 2 | NLB LAN |
Used for internal NLB heartbeat |
Creating NIC Cards :

The NIC Cards need to be configured with IP address & Subnets based on business or infrastructure requirement , we must ensure that the binding order is configured to bind the Public LAN NIC first as shown below:
Configuring NIC Cards:
Open the property page of Internet Protocol Version 4 (TCP/IPv4). Here we have a static IP address configured as well as the other necessary settings (default gateway, subnet mask, and DNS server).
The Public LAN NIC on each server should be configured normally, with an IP address, subnet mask, default gateway, DNS servers, etc.
For this example:
EXCHCAS1 (192.168.10.32) and
EXCHCAS2 (192.168.10.35) as my two CAS servers.
The NLB LAN NIC on each server should be configured with an IP address and subnet mask only.
For this example:
EXCHCAS1 (192.168.10.37) and
EXCHCAS2 (192.168.10.39)
With IP address and subnet mask only
Now that we have configured each NIC, we must make sure the “Public LAN NIC is listed first on the binding order list. To bring up the binding order list, you must press the ALT key, and then select Advanced > Advanced Settings.
Selecting Advanced Settings in the Network Connection menu and move the Public LAN NIC to the top as shown below:

Installing the Windows Server 2008 NLB component
There are two ways
1: Using Powershell as adding feature
2: Server Manager and installing NLB Component under Feature
In previous versions of Windows Server, the WNLB component is not installed by default in Windows Server 2008 and Windows Server 2008 R2. To install the WNLB on Windows Server 2008.
Open the Server Manager and select Features -> Add Features.
This brings up the Add Features Wizard, where you simply tick Network Load Balancing and click Install. When the NLB feature has been installed, click Finishand exit the Server Manager.

Click Next Install the Feature and Reboot the Server.
Creating Host Record in DNS for CAS
Log on to a Domain Controller in your Active Directory forest, then open the DNS manager by clicking
Start > Run and type dnsmgmt.msc.
Expand the Zones and navigate to Forward Lookup Zones container and right-click on the respective forward lookup zone for your Active Directory. On the context menu select New Host (A), then type the name (based on your requirement) you want to use.
But using client.domain.com(FQDN) is actually best practice.
When you have entered the name for the host record, type the IP address you plan to use for the WNLB array.

Creating CAS array object in Active Directory
It’s just a small command that will help us to create, Command as shown below:
New-ClientAccessArray –Name “CAS array” –Fqdn -Site
According to my Scenario command has been modified as shown below:
New-ClientAccessArray –Name “CAS Array” –Fqdn -Site
Default-First-Site-Name
Creating the Windows NLB array
Start -> Administrative Tools -> Network Load Balancing Manager. Now select Cluster in the menu and then New.

Enter the name of the first node you wish to add to the WNLB array, then click Connect. After a little while, you will see the NICs available for configuring the new NLB array.
Select the one named NLB, and click Next.

On the Host Parameter page, leave the defaults as is and click Next.

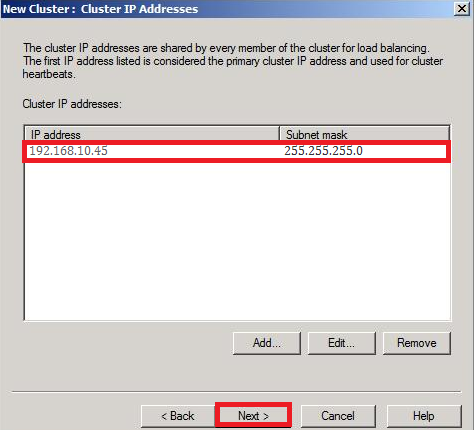
Add the IP address you wish to associate with the WNLB array. Remember this should be the same IP address that you also specified when you created the DNS record (client.techrid.com.com) for the CAS array. When the IP address has been added, click Next.
Now we need to specify the FQDN of the WNLB array as well as the operation mode. In this article I will call the WNLB array as “CAS1.techrid.com”, use any other based on your requirement.
Make sure Unicast mode is selected and click Next.

Click Next and delete the default port and click Finish.
Now it’s time for adding ports, in case if you forgot to remove the default port.
Let’s remove the port using Powershell commands as shown below:
Get-NlbClusterPortRule | Remove-NlbClusterPortRule -Force
We’ve have deleted default port, let’s go ahead and create new port rules for HTTP/S and MAPI RPC ports:
Get-NlbCluster | Add-NlbClusterPortRule -StartPort 80 -EndPort 80 -Protocol TCP -Affinity Single
Get-NlbCluster | Add-NlbClusterPortRule -StartPort 443 -EndPort 443 -Protocol TCP -Affinity Single
Get-NlbCluster | Add-NlbClusterPortRule -StartPort 135 -EndPort 135 -Protocol TCP -Affinity Single
Get-NlbCluster | Add-NlbClusterPortRule -StartPort 1024 -EndPort 65535 -Protocol Both -Affinity Single
Now it’s time to add the Second Node as shown below:
Get-NlbCluster | Add-NlbClusterNode -NewNodeName EXCHCAS2 -NewNodeInterface NLB
Huh Great Now Check in Network Load Balancing Manager if you are able to see both the Nodes.

Note:
If you have dual NICs and your NLB interface doesnt not have a default gateway, you have to enable IP forwarding using the following netsh command as shown below:
Netsh interface ipv4 set int “NLB NIC NAME” forwarding=enabled
Praveen Kumar
MCTS, MCITP | Exchange Server
Publisher @ Techrid.com
