
Creating Send Connector in Exchange Server 2010
Small Glance on Send Connector
Send connectors create a logical connection to remote email systems and are responsible for outbound transmissions. When you use the Edge Sync process, it will configure the Send connectors automatically. Alternatively, you can create the Send Connectors manually with either the EMC or the Shell.
When designing outbound message flow in Exchange 2010, consider the following factors:
Will you use a single location for routing all messages to the Internet? Or will you enable message routing through multiple locations? If your organization has more than one location with an Internet connection, you can enable message routing through each. To do this, you can either:
- Install an Edge Transport server in each location and configure edge subscriptions between the Edge Transport servers and the local Active Directory sites.
- Manually configure Send connectors on the Hub Transport or Edge Transport servers.
We need be concerned only with a single connection, from the internal network to the Internet. On the other hand, multiple routes provide redundancy and load balancing.
Internal Send Connectors
we probably won’t need to create internal Send connectors, because they are created automatically when you add the Hub Transport role.
Partner this type of connector is used to forward messages to partner domains.
Partner connectors allow connections only to SMTP servers that authenticate using TLS certificates.
Custom Send Connector
This time to establish extra Send connectors is when you want to create direct routes rather than using the internet. With this type of Send connector, you specify the address space and the smart host.
Keep in mind that if you create another Send connector, that connector can be used by any Hub Transport server in your organization. This is because all configuration data is stored in Active Directory.
In addition to the security v redundancy factors, which apply email in both directions, inbound message flow has extra challenges.
First remember that receive connectors just affect the local server, whereas send connectors affect the entire Exchange organization.
The key point with a receive connector is that it must contain a unique combination of: IP address bindings, port-number assignments, and the remote IP address ranges. One reason of creating extra receive connectors is that particular sources require authentication.
How are you are going to plan for MX record with multiple inbound routing points? If you configure MX records with different priorities, then the SMTP servers with the lowest priority MX record references are contacted first for all inbound messages. MX records with higher priorities are only referenced when the first SMTP server is not available.
Configuring Send Connector using Exchange Management Console
Send Connector is required to Send Emails over the internet
If send connectors are not created, Emails to the Internet won’t work for Exchange 2010
Step1:
Click on Organization Configuration -> Hub Transport -> Send Connectors,
Right Click on the Screen – New Send Connector

Step2: We can provide the name as per the requirement.

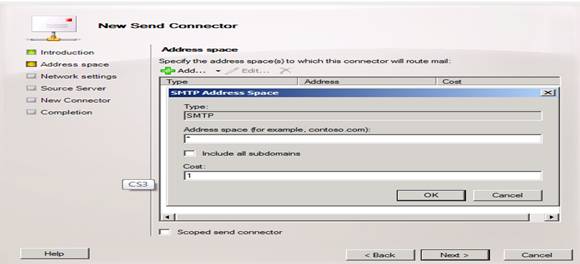
Step3: Click on add type “*” in address space, this is by Default
Step4: By Default Type – Use Domain Name System (DNS)
If your using a smart host “Route Mail through the following smart hosts”
Add the ip . And configure your smart host for the same

Step5:
We need to add or configure the Source Server as per the Requirement.
Post adding the Source Servers click next.
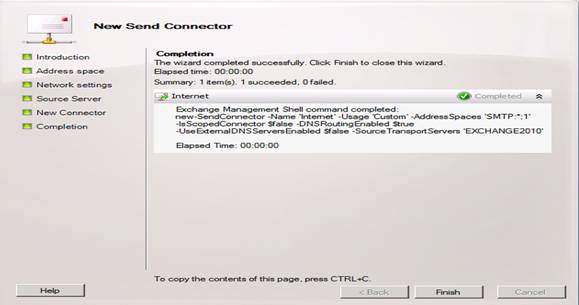
Now we have Configured Send Connector for your Exchange 2010 Server
Tune up to see Configuring Send Connector in Cross Forest using EMS
Praveen Kumar
MCTS | Exchange Server
Publisher of Techrid.com
