
Configuring Receive Connector in Exchange 2013 with explained using Powershell
Now Let’s talk configuring Exchange Receive Connector in 2010, transport servers require Receive connectors to receive messages from the Internet, from e-mail clients, and from other e-mail servers. A Receive connector controls inbound connections to the Exchange organization. By default, the Receive connectors that are required for internal mail flow are automatically created when the Hub Transport server role is installed. The Receive connector that’s capable of receiving mail from the Internet and from Hub Transport servers is automatically created when the Edge Transport server role is installed.
In Exchange 2010, the Receive connector is a receive listener. This means that the connector is listening for inbound connections that match the settings of the Receive connector. A Receive connector listens for connections that are received through a particular local IP address and port, and from a specified IP address range.
Certain Receive connectors are created by default when you install a Hub Transport or Edge Transport server role.
Configuring Receive connector:
- Open the Exchange Management Console.
- Expand Server Configuration.
- Click on Hub Transport.
- Select the server name on the right hand side.
- In the Toolbox Actions. Click on New Receive Connector.

Let’s name this new connector using the Name field, and we can also select which kind of connector. We have five options: Internet, Internal, Partner, Client and Custom and each one of them defines a set of authentication and permissions on the connector that we are creating. The choice of connector also changes the New Receive Connector wizard, so it is not the same wizard for all types of pre-configured connectors.
In this article we are going to start playing with an Internet Receive Connector, so let’s click on Internet and click on Next.
Note:
If we choose a wrong type of connector we can always change the configuration afterwards. It is not necessary to recreate it due to choosing the incorrect option.

Here we had chosen Client, Partner or Internal instead of Internet? What would be the difference? The following table shows which changes will be applied for each type of receive connector chosen. We have three columns, the first one (During Wizard) shows which information will be required during the New Receive Connector Wizard; the second one (Authentication) shows what authentication method will be configured by default in the new Receive Connector and the last one (Permissions) shows which groups are marked in the Receive Connector permissions.
|
During Wizard |
Authentication |
Permissions |
|
|
Internet |
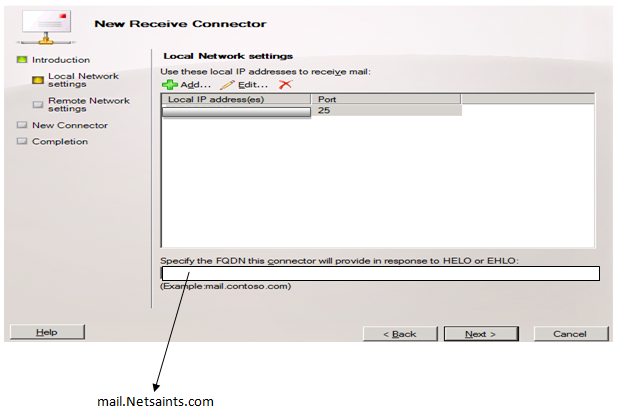
In Local Network settings page, we can manage the Local IP Address(es), Port and specify FQND. |
TLS |
Anonymous Users |
|
Internal |
In Remote network settings we can change the remove IP Address range. |
TLS Exchange Server Authentication |
Exchange Servers, Legacy Exchange Servers |
|
Client |
In Remote network settings we can change the remove IP Address range. |
TLS Basic Authentication and Offer Basic authentication only after starting TLS |
Exchange Users |
|
Partner |
On the Local Network settings page we can manage the Local IP Address(es), Port and specify FQND. In Remote network settings we can change the remove IP Address range. |
TLS and Enable Domain Security (Mutual Auth TLS) |
Partners |
|
Custom |
On the Local Network settings page we can manage the Local IP Address(es), Port and specify FQND. In Remote network settings we can change the remove IP Address range. |
TLS |
None |
This name will be displayed when a connection is established with this Receive Connector. Click on Next.
New Connector. A summary of our choices made so far. Click on New to create the Receive Connector.
Completion. Final screen of the new receive connector wizard with all the information provided during the wizard and the cmdlet used to create it. Click on Finish.
Using EMS
The same Receive connector can be configured by using EMS
To create we have to use the New-ReceiveConnector cmdlet. In this example we are going to create the same connector described in the steps above:
New-ReceiveConnector -Name “Techrid” –Server MB1 -Usage Custom -Bindings 10.x.x.x -RemoteIPRanges 172.128.1.1-172.128.1.100 -MaxMessageSize 20MB
If the Server holds Multi Role like Mailbox, Client Access & Hub Transport then below is the command but the parameters like TransportRole associated with the connector
New-ReceiveConnector -Name “Connector Name” –Usage:Internet –Bindings:<10.x.x.x IP Address or 0.0.0.0 for all IP addresses>:<port number> -fqdn: ‘<FQDN that will be used by this connector>’ –Server <Hub transport Server name>
For More Info:
http://technet.microsoft.com/en-us/library/dd297988(v=exchg.141).aspx
http://technet.microsoft.com/en-us/library/aa996395(v=exchg.141).aspx
Adding Remote IP Addresses to Existing Receive Connectors
http://exchangeserverpro.com/how-to-add-remote-ip-addresses-to-existing-receive-connectors/
Praveen Kumar
MCTS | Exchange Server
Publisher of Techrid.com
