
Today let’s discuss about Disaster Recovery, the procedure is same in Exchange Server 2010 & 2013.
Before we jump first we’ll see what is Disaster Recovery and causes:
What is Disaster Recovery?
Failure of hardware or software, multiple database copies in a DAG enable high availability with fast failover and little or no data loss. This eliminates downtime and the resulting lost productivity that’s a significant cost of recovering from a past point-in-time backup to disk or tape. DAGs can be extended to multiple sites and can provide resilience against disk, server, network, and datacenter failures.
Causes : Usually this could be with Climatic change like Floods or Natural Disasters.
Ex: Like Hurricane, Earthquake or either it could be with Floods.
Exchange Server recovery is most critical task for Exchange Admin.
Usually when there is natural disaster or flood on your current datacenter site you may lose all the servers. So it really important thing to have recovery plan from any kind of situation to recover our servers.
Below are the same steps or tasks that can be performed for Exchange Server 2010 & 2013.
Here in my scenario I’m recovering a lost exchange server 2013 on different hardware.
Exchange 2013 server can be recover by using the switch “Setup /m:RecoverServer /IAcceptExchangeServerLicenseTerms“. Which rebuilds the Exchange server with the same name by using object information from Active directory.
Before we start we need to check the installation path of Exchange Server if we have installed it on different location then we need to use the switch “/Targetdir” to specify the location.
Open the ADSIT EDIT tool.
Start -> Run -> adsiedit.msc -> Enter now navigate to the following location as shown below:
CN=Ex-15,CN=Servers,CN=First Administrative Group,CN=Administrative Groups,CN=First Organization,CN=Microsoft Exchange,CN=Services,CN=Configuration,DC=techrid,CN=Com
Right click on Exchange Server (EX-15), on the properties Tab bottom of the screen click on Tab Filters and select “show only attributes that have values” as shown in the below screenshot:

Now this will open another window which will show the properties of EX-15 which has values as shown below:
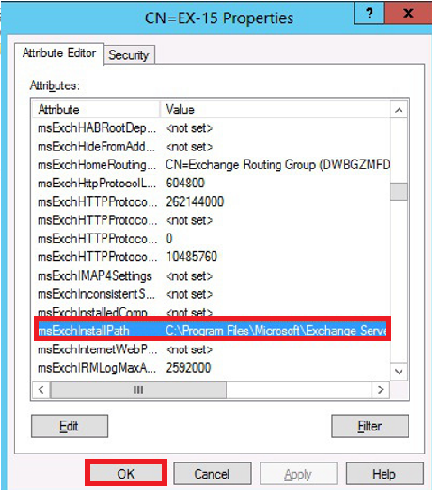
Check the MSExchInstall Path to verify the correct path.
In my scenario its default location C:\Program Files\Microsoft\Exchange Server\V15.
Now there are few more steps or task you need to perform for recovering Exchange Server
First we need to reset the computer account from AD
- Deploy new operating system with latest windows updates
- Assign same ip address
- Join to domain with the same Server name as before
- Assign same drive letters on the server
- Install pre-requisites which is required
- Now open the CMD “Run as Administrator”
- We will use “Setup /m:RecoverServer /IAcceptExchangeServerLicenseTerms”
- mode installation
In brief open the AD Users & Computers navigate to Computers, on the right side on the Computer account (EX-15), right click and click Reset Account as shown below:
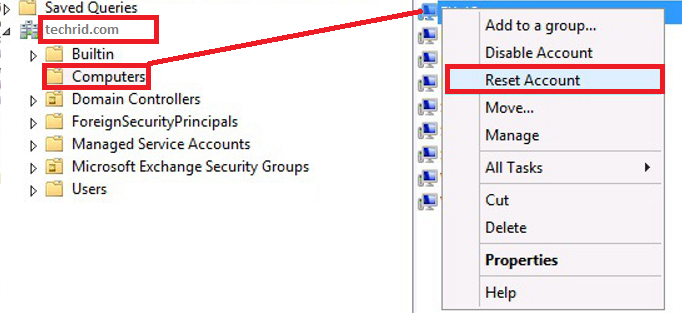
Click Reset Account and then click OK.

We are done with the new operating system with all the Pre-requisites installed on new server
Let us start recovering the server using the below switch
“Setup /m:RecoverServer /IAcceptExchangeServerLicenseTerms”
Open the CMD “Run as Administrator” locate to Setup folder and run the above switch.

Reboot the server
You can login to https://ex-15.test.com/ECP
Now Join this Server to the Domain.
After joining the Exchange Server now we need to recover the Mailbox & content. So let’s see step-by-step:
Recovering Database:
A recovery database is a special kind of mailbox database that allows you to mount a restored mailbox database and extract data from the restored database as part of a recovery operation. You can use the “New-MailboxRestoreRequest” cmdlet to extract data from a recovery database. After extraction, the data can be exported to a folder or merged into an existing mailbox. Recovery databases enable you to recover data from a backup or copy of a database without disturbing user access to current data.
Using a recovery database for a Mailbox database from any previous version of Exchange isn’t supported. In addition, the target mailbox used for data merges and extraction must be in the same Active Directory forest as the database mounted in the recovery database.
New-MailboxRestoreRequest
Use the New-MailboxRestoreRequest cmdlet to restore a soft-deleted or disconnected mailbox. This cmdlet starts the process of moving content from the soft-deleted mailbox, disabled mailbox, or any mailbox in a recovery database into a connected primary or archive mailbox.
Creating the Restore Request
To create a restore request, you must provide the DisplayName, LegacyDN, or MailboxGUID for the soft-deleted or disabled mailbox. This example uses the “Get-MailboxStatistics” cmdlet to return the DisplayName, LegacyDN, MailboxGUID, and DisconnectReason for all mailboxes on mailbox database MBD01 that have a disconnect reason of SoftDeleted or Disabled.
Restoring Database:
Syntax :
Get-MailboxStatistics -Database MBD01 | Where { $.DisconnectReason -eq “SoftDeleted” -or $.DisconnectReason -eq “Disabled” } | Format-List LegacyDN, DisplayName, MailboxGUID, DisconnectReason
Example:
![]()
Restoring Mailbox:
Restore the source mailbox with the MailboxGUID 1d20855f-fd54-4681-98e6-e249f7326ddd on mailbox database MBD01 to the target mailbox with the alias Praveen
Syntax:
New-MailboxRestoreRequest -SourceDatabase “MBD007” -SourceStoreMailbox 1d20855f-fd54-4681-98e6-e249f7326ddd -TargetMailbox Praveen
Example:

Restoring Content:
Restore the content of the source mailbox with the DisplayName of Tony Smith on mailbox database MBD007 to the Archive Mailbox for Praveen.Eppili@techrid.com
Syntax:
New-MaiboxRestoreRequest -SourceDatabase “MBD007” -SourceStoreMailbox “Praveen Eppili” -TargetMailbox Praveen.eppili@techrid.com -TargetIsArchive
Example:

For More Info:
http://technet.microsoft.com/en-in/library/dd876880(v=exchg.150).aspx
http://technet.microsoft.com/en-in/library/dd876874(v=exchg.150).aspx
Praveen Kumar
MCTS, MCITP | Exchange Server
Publisher @ Techrid.com
